Wednesday, June 24, 2015

Even More Sight Word Fun


Hello all,

Welcome back and thanks for hanging in there.  Today is the third installment of the sight word program.  You can read about the posts here and here.  Today, let’s talk about ORGANIZATION!  Which I secretly LOVE!  


First off, to get started I gathered a few materials I knew I was going to need for this project, so I got colored copy paper {red, orange, yellow, green, blue, purple, and pink}.

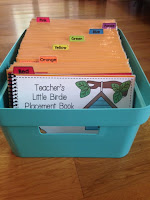
To keep all these goodies organized I got a SUPER cute box from Target.  This box fits the 6 X 9 brown kraft envelopes well and I was able to fit all teacher assessment books, dividers, and class sets of all 62 word lists cards.  I like to laminate everything so I made sure I had access that too.  I made copies of everything I needed and got straight to work. 

Putting It Together:

I put the Placement Assessment book first.  Yesterday I talked about the assessment books.  Click here to read the post.  Next, I put the red divider for the pre-primer words.  The dividers are included in this kit and would do best printed on card stock and laminated.  Then, I placed the Red List Assessment Book and then all of the envelopes that go with the red lists.  Yesterday I stated that there are 8 pre-primer lists so you would need 8 envelopes. 


To create the envelopes, I printed the labels on red paper and attached them to the brown, kraft envelopes.   Before running them through the laminator, I took out the metal clasps.  I would highly recommend this step so that you do not ruin your laminator.   I printed the pages that I needed onto the color I needed, cut them in half, and put the whole set into the envelope.


Don’t want to go through all of the work of making the envelopes?  It is simple, just use paper clips to hold the groups of pages together…and done!

For the Teacher Assessment Binder for the RtI and progress monitoring documentation, I gathered a 2 in binder and enough dividers for the amount of students in my class and printed the binder pages. 


Is all of this organizing getting you excited about this unit yet?  No too much longer until I have the unit complete and available on Teachers Pay Teachers.  Tomorrow I will be posting about how to use this unit in your classroom throughout the day as we explore the word wall and centers.   

Speaking of centers...here is the center activity of the day.  This center activity is a class favorite!!!  It is called Flip, Compare, and Read.  To  create this game, get an egg holder {I happen to find this one during an Easter sale :0) YAY!}, 2 colorful buttons, and a set of sight word cards.  I wrote numbers inside of the egg spots.  The kids flip their buttons at the same time and compare their numbers.  The person with the largest number get to pick a card and read the card.  If the word is read properly, that student gets to keep the card.  If it is not read properly, and the partner can read the word, the partner gets to put the card in his/her pile.  The student with the most word cards wins the game. Get your game card here.


Happy organizing,
Coconut Cutie


Monday, June 22, 2015

More Sight Word Fun!


Hello again,

Today I am back to talk about my new sight word {also known as high-frequency words} unit and to give you another freebie center activity.  This unit includes all of the Dolch sight words, including the nouns, as well as some vocabulary words.  This allows the teacher to differentiate homework, assessments, and centers to meet the students where their needs are.  


This sight word unit, as I mentioned yesterday, is a program that is an all-inclusive sight word program that includes a word wall, homework system, assessments for progress monitoring for RtI, and centers. 

So today I want to talk to you about how it works with you and your students.  As a whole group, read “Rocket Writes a Story”.  Talk about how Rocket kept a collection of words for reading and writing and they too will keep a collection of words.  Show the “Rocket’s Mighty Words” book then show them an example of what their collection of words will be kept in, look like, etc.  Mine is just a zip-lock back that is 3-hole punched and put into a homework folder and they will have a word dictionary that they will write their words into and keep the dictionary in their desk.  This is a post for another day.


Getting started:
Initially, you will assess the students on their prior knowledge of sight words.  To do this, the teacher will have the student use the assessment book to read the words that they can read.   I laminated and bound mine because it will get a lot of use.  Turn to the first page which is the first of the Dolch Sight Words Lists, the Pre-Primer.  Have the student read the first word list going across.  If they can read all of the words and fluently, move them down to the next row and do it again.  Keep having the student read the words in this manner until they miss a word.  Once they miss a word or so, stop the assessment and mark that this is their sight word level.  


They will be given sight word cards to study for the rest of the week.  They cut these cards up and keep in a zip-lock bag in their homework folder.  Once home, they study the words and will be assessed on Friday.  The cards are on red paper to match the level that they are on.  Now at this point you may be noticing that there is a word from the noun list.  On each word list, there are 5 words from the sight word list and 1 from the noun list to learn each week (there are a few exception lists).  Each week students will learn 6 words a week.  At the end of the week, students will be tested again.  This time, use the leveled assessment book according to what level the student is on.  In this case, the student had list 5 from the pre-primer {red} level so the teacher would get the red book and turn to list 5.

You will also notice that as the students are assessed, not only will they be assessed over the words they have been studying in isolation, but they will also be assessed over the words reviewed in prior lists {to spiral} in context.  At this time, we are also working on fluency so set a timer for 30 sections or 60 seconds depending on what you want your students to do and have them read the words in isolation.  Mark which words they read incorrectly.  Then have the student read the sentences, again marking words that they missed.  Calculate the percentages of words missed.  Decide what percentage you would like to see before moving the student on to the next list.  Some people require only 80% of the words read correctly to move on, you may decide differently, it is up to you.  I personally would not move anyone on to the next level until the words and sentences are at a 100%.  


Let’s say the student does not pass the level, they continue to work on the same list, list 5.  However, if the student does pass the level, they would move on to the red list 6 and at this time, hand the red paper with list 6 to the student to cut up, place in his/hers word collection bag/box and take home to study for the next week assessment. 

Now let’s say that several weeks go by and that same student has now reached the end of all of the lists in the red book.  They would then review all of the words practiced as well as read sentences that have included only pre-primer + noun words that have been practiced. 


Once this level is passed, the student would move onto the next set of words, the Primer words and do the same process.  

All in all, there are 8 different teacher assessment books:
-Placement book
-Red Lists {Pre-Primer}/includes 8 word lists + review pages
-Orange Lists {Primer}/includes 10 word lists + review pages
-Yellow Lists {1st Grade}/includes 9 word lists + review pages
-Green Lists {2nd Grade}/includes 9 word lists + review pages
-Blue Lists {3rd Grade}/includes 8 word lists + review pages
-Purple Lists {Nouns}/includes 9 word lists + review pages
-Pink Lists {Vocabulary/Challenge-Not Dolch}/includes 9 word lists + review pages

This mean a total of 62 word lists! 

Tomorrow I will be back to talk about how to keep all of this organized.  WHEW!

And of course, the moment you have been waiting for...the center activity of the day.  It’s called Jenga Words to Know and it is an oldie but a goodie.  I learned of this game my first year of teaching from some wonderful colleagues.  To make this game, I picked up these “Tumble Tower” blocks at Dollar Tree.  I used a Sharpie marker to write the words onto the blocks.  The students play just like Jenga, the only difference is they read the word on the block before placing on top of the tower.  Get your direction card here.


Happy assessing,
Coconut Cutie